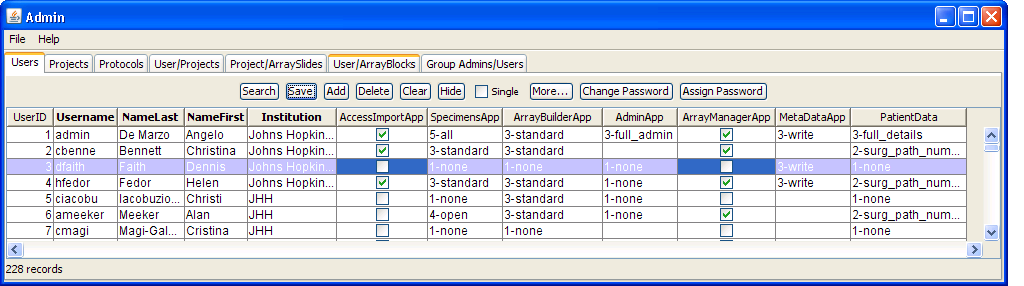
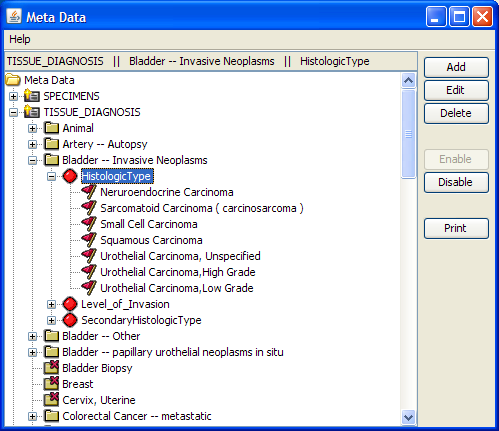
Administrator Application

Purpose

Background


Users Tab

New users are added to TMAJ using this section.  Information about existing users may be modified here. 


Users Tab

Group Admins

A group admin is an admin that only has only partial admin rights.  While an admin can change the information on any user, project, array-block, array-slide, or specimen, a group admin can only change some of them.  Group-admins has more rights than an ordinary user in that they can grant rights to other people in their group.  Non-admins cannot grant access to resources they own, while a group admin can.  Group admins log onto the admin application but will only see a subset of the projects, users, etc.  Whatever group-admins can see, they can assign to users in their group.  Group admins are a great way to separate information in TMAJ if several labs are using the same instance of TMAJ and they do not want other labs to see their data.  A group admin can be set by setting the AdminApp setting in the Users tab in the Administrator application.

Passwords

Passwords assigned in TMAJ must have at least 6 characters, at least 1 letter, and at least 1 number. 
Passwords in TMAJ are case-sensitive. 
TMAJ does not store a user's actual password, but rather a 1-way hash of the password, so it is impossible to "lookup" somebody's password. 


Change Password Dialog.  You may change any user's password in TMAJ by clicking on the row of the user, and then clicking the Change Password button. 
Assign Random Password Dialog.  To assign a randomly-generated password to a new user, highlight the user's row, and click the Assign Password button. 


Protocols Tab

A protocol is a description of a scientific experiment that the Internal Review Board has given permission for a researcher to perform. 
The Protocols table is not connected to any other tables in TMAJ, and is not required to get TMAJ to work.  However, following and keeping track of protocols is important for being HIPPA compliant. 


Projects Tab

A project is a collection of ArraySlides.  ArraySlides are added to a Project in the Projects-ArraySlides tab
We group ArraySlides into projects so that we can give users access to only some of the ArraySlides.  Generally the only thing you need to enter a new project is the project name.  If you do not wish to use projects in your version of TMAJ, just create one default project and assign every arraySlide to it.


Projects Tab


Project/ArraySlides Tab


ArraySlides are assigned to projects in the Projects-ArraySlides tab, as shown to the right. 

To add an ArraySlide to a Project:
  1. Log on to the Admin application
  2. Click on the Project/ArraySlides Tab
  3. Locate the Project you want to add an ArraySlide, and then click on it.  The ArraySlides currently in the project will be displayed on the right side on the panel.
  4. Click the Add button.  A Dialog showing every ArraySlide in TMAJ will be displayed.  Click any ArraySlides you wish to add to the project.
    Add ArraySlides Dialog. 
  5. Click the Okay Button to close the Add ArraySlides dialog.  You will see the new ArraySlides added.
  6. Click the Save Button

Project ArraySlides Tab.  This tab is used to add ArraySlides to a project. 


User/Projects Tab

In the Images application, security is controlled by giving users only access to certain projects.  A project, as discussed before is merely a collection of ArraySlides.  Therefore, you limit what ArraySlides a user may access by assigning users to one o rmore projects.  This screen allows you to assign a user to one or more projects. 

Note the rules of Users-Projects do not apply to users who are administrators.  Administrators have access to all projects, no matter what is assigned on this screen.

Users-Projects Tab


User/Arrayblocks Tab

The ArrayBuilder application only lets users design ArrayBlocks to which they have permission.  An administrator can set which ArrayBlocks a user may access by using this tab. 
Note#1: If a user is given read-only access to ArrayBuilder, the user may not change the design of ANY arrayblock.  They may only SEE which arrayblocks they have been assigned in this tabl.
Note#2:  If an ArrayBlock has been designated as Final, no user may modify the ArrayBlock.

Users-ArrayBlocks Tab


Assigning Specimens To Users

An administrator may assign a set of specimens to the user.  The UsersSpecimens table actually keeps track of what specimens to which each user has access.
Note that this does not apply to users who have been given permission to view all specimens.  For them, it does not matter what is in the UsersSpecimens table. (See SpecimensApp Permission for details) .
There are 3 ways a user may get permission to view/modify a specimen:
  1. They have been given "All Access" on the SpecimensApp Permission so that none of these rules apply.
  2. An administrator has manually given them access, as described below.
  3. The user created the specimen.  If you create a specimen, you automatically get access to it.  (On the database level, this means a record gets added to the UsersSpecimens table.)

How to Assign Specimens to Users

Note: You must be an administrator to perform this task.
  1. Open the specimens application
  2. Click the search button to search for the specimens you wish to assign to the user.
    Use the Sort/ Filter dialog to filter out any specimens you do not wish to assign to the user.
  3. Highlight the specimens you wish to assign to the user.  You can highlight multiple specimens by holding down the CTRL button.  You may select all specimens displayed by clicking CTRL-A.
  4. Click the Assign button.  The Assign Specimens To User dialog will pop up.
  5. Choose a user
  6. Click the Assign button in the dialog.  The confirmation message with then pop-up saying you assigned X number of specimens to the user.


Specimens Application -- The highlighted specimens are in blue.  The Assign Specimens to Users dialog comes up after the Assign button is clicked.


Confirmation Message


Summary of Security Options


All 4 of TMAJ's user applications have security options that can be set in the administator application.  These security allow a user to limit the data a user can view in the respective application.

TMAJ User Applications and their Security Options
Application
Security Options
Image Manager Application
ArrayBuilder Application
ArrayManager Application
  • Prevent users from accessing this application by unchecking ArrayManagerApp in the Users Tab.
Specimens Application
Import Application
  • Prevent users from accessing this application by unchecking AccessImportApp in the Users Tab.
Administrator Application
  • Prevent users from accessing this application by unchecking IsAdmin in the Users Tab.


Meta Data Tab


This application is used to view and modify the dynamic meta data in TMAJ.

Icon Descriptions
Icon
Description
Yellow Folder
a type. In the Specimens section, a SpecimenType.  In the TissueDiagnosis & ScoredImages Section, a TissueType
Red/Black Dot
a field.  If the dot is red, it means it has enumerations.  If it is black, it means the field is not enumerated (type-in).
Red Flag
an enumeration


Meta Data Application


Buttons in the Meta Data Application


Button Name
Description
Add
Add a type, field, or enumeration.  To add an enumeration, highlight the field to which you want to add an enumeration.  To add a field, highlight the type you want to add the field to.  To add a type, highlight the section (Specimens, TissueDiagnosis, or ScoredImages) to where you want to add the type. 
Note: TissueDiagnosis & ScoredImages both use the same types (TissueTypes).  So adding, changing, or deleting a type on one is equivalent to doing it to the other.
Edit
Give the highlighted entry a new name.  The highlighted entry may be either a type, field, or enumeration.
Delete
Delete the highlighted entry.  The highlighted entry may be either a type, field, or enumeration.  Note that this operation will fail if any data references this entry.  Thus this operation is relatively safe.  For example, lets say you are trying to delete a field called "Prostate Zone".   The operation will fail if the field has any enumerations.  You must first delete all the enumerations.  Also, this operation will fail if any outside data used this field to record some value.  For example, lets say some TissueDiagnosis has ProstateZone recorded and it is set to "No Zone".  There is no way to handle this from the MetaData application.  You must contact a database administrator to delete these fields.
Enable
Enable the buttons Add, Edit, and Delete, so that modifications can be made to the Meta Data.  You will be prompted for the application password.  This is not the same as your user password.  Contact a TMAJ administrator to give you this password.
Disable
disable the buttons Add, Edit, and Delete.  No one will be able to modify Dynamic Meta Data until the Enabled button has been pressed.
Print
dump a description of the Dynamic Meta Data in TMAJ to a text file.


<< Back to the Manual

© Copyright 2009 | All Rights Reserved | The Johns Hopkins University